You’ve bought a TS-55R, well done on a great purchase!
Obviously, I would recommend reading the user manual, but I know many of you are never even going to open it but TS-55 set up is pretty simple but we’ve still made it easier with this guide.
Remember this is a precision engineered machine, and as such there a couple of things you should know to make sure you get the best out of it.

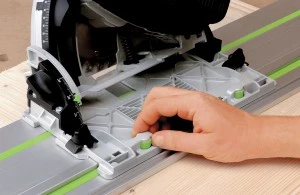
Firstly, you will need to set up the machine to fit the guide rail exactly; this will ensure that you have straight and true cuts for the future. When you place the saw on the guide rail for the first time you will see that there is a small amount of play on the machine. By tightening the green cams on the base plate, you will see that the fit becomes tighter, continue to tighten until there is no play. Be careful not to over tighten these cams, there should be no play in the saw but also the saw should glide along the guide rail with no resistance. If it requires effort to push the saw along the guide rail then you need to loosen the cams.
Done? Great now let’s move to step 2. You may have noticed that the splinter guard on you guide rail seems to be too big as it is overhanging the edge of the guide rail. This is deliberate once the saw has been correctly fitted to the guide rail you can now turn on the saw and run the saw down the guide rail to cut off the excess from the splinter guard. Now just clip the green splinter guard to the machine and you are ready to go!
Have fun.

